|
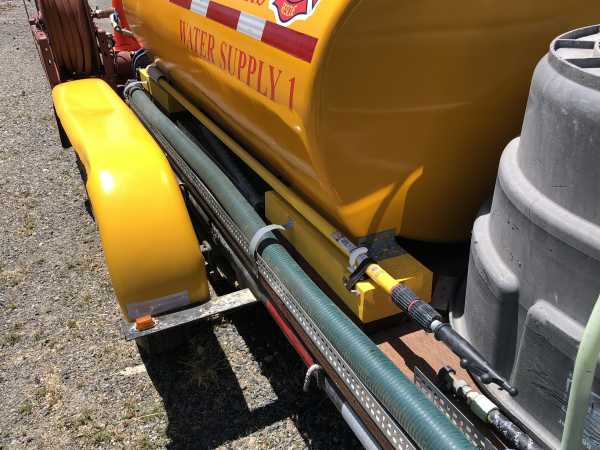
The pump has two suction connections, one plumbed to the 400 gallon tank and one external connection on the left rear of the trailer just inboard of the "red box."
The external suction intake has a 2 inch Cam Lock connection. A 15 foot long 3-inch supply line is located in the red box that can be used to fill the tank from a piece of fire equipment or fire hydrant when authorized to do so. This supply line has a 2Ẅ inch NST fitting on the outboard end for connecting to standard fire service connections.
(Tank refilling procedures are outlined later in this Operations Guide.)
The drafting hose connects directly to the Cam Lock connector.
(Drafting procedures are outlined later in this Operations Guide.)
Ordinarily the pump will be operated using supply from the tank.
Starting the pump.
- Turn on the ignition switch, located behind the pump engine (on the water tank side of the engine.)
- Turn on the fuel valve. (It is the lower lever on the right side of the engine. Slide it toward the water tank.)
- Set the choke. (It is the upper lever on the right side of the engine. Slide it away from the water tank.)
The engine will need a few seconds to warm up, then the choke can be opened and the throttle (located just under the fuel tank) can be increased.
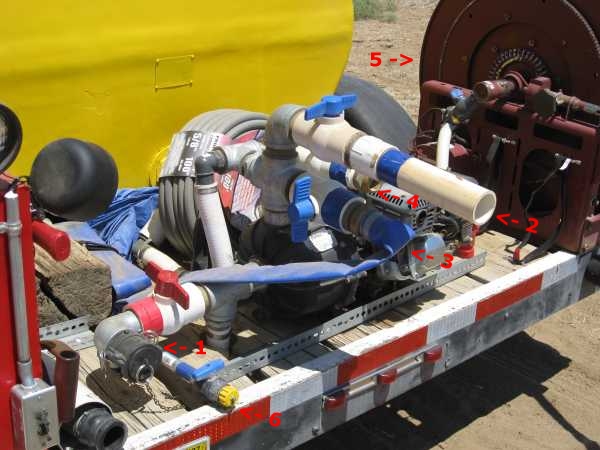
Plumbing layout:
Suction port marked in red. Discharge ports marked in blue.
Suction:
(1) 2Ẅ-inch hose thread.
Can be used for drafting or soft suction.
Discharges:
(2) 2-inch dump
(3) 2-inch preconnect
(4) 1Ẅ-inch discharge
(5) 1-inch booster line on reel
(6) 3/4-inch discharge.
Operating the pump.
- All discharge valves are generally kept closed, including the booster reel supply valve, unless being used.
- This is not a large capacity pump. It can generally supply two garden hoses (four garden hoses when operating the jetting wands) or the booster reel or the 2-inch preconnected discharge.
- The tank fill valve, located on the trailer deck right behind the water tank, must be closed in order to generate sufficient pressure in the discharge lines.
- The 2-inch dump valve is typically the most efficient means to fill portable tanks if the trailer can be backed up close to the tank.
- If the pump is suffering an air lock, the dump valve can be opened for a brief moment to expel trapped air.
- If water is not going to be flowed for a long period of time, the pump should be shut down to prevent overheating. If the pump is at draft and you don't want to lose prime, circulate a small amount of water via a garden hose or the booster reel turned on low to prevent overheating.
Filling the tank.
Ordinarily we fill the tank with a garden hose. This process takes about 45 minutes depending on hose bibb pressure and the length of the hose being used to fill the tank.
When using a garden hose:
- Attach a double female adapter found in the silver box to the garden hose discharge at the rear of the trailer.
- Attach a garden hose between the hose bibb and the double female adapter.
- Open the tank fill valve located on the trailer deck just behind the water tank.
- Turn on the garden hose. (When the tank is full water will discharge from the overflow vent at the top of the tank.)
- Close the tank fill valve.
- Shut down the hose bibb.
- Return the garden hose and the double female adapter to their proper storage locations.
When filling using the 2-inch supply line:
- Open the inspection cover on the top of the tank. This step is critical as filling the tank from a large volume supply without opening the cover can result in overpressurization and destruction of the tank!
- Connect the filler hose between the water source and the Cam Lock connection at the rear of the trailer.
- Open the tank fill valve located on the trailer deck behind the water tank.
- Open the intake valve at the Cam Lock connection.
- Open the hydrant or fire apparatus discharge into the supply line.
- When the tank is filled, close the valve at the Cam Lock Connection.
- Close the tank fill valve.
- Shut down the supply to the filler hose.
- Once it is confirmed that supply is shut down, remove, drain and store the filler hose. (The fastest way to drain the filler hose is to remove it from the Cam Lock connection first. Remember that the double female 1Ẅ inch adapter on the other end of the hose belongs to LRTC!)
- Close and secure the tank inspection cover.
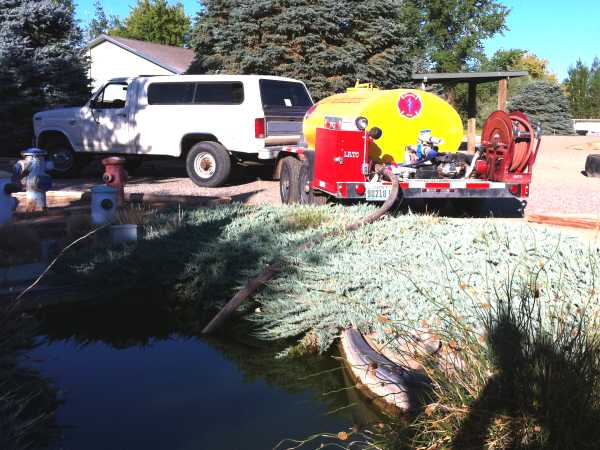
Operating at draft.
Drafting operations are a little more complex. The pump is of self-priming "splash" design however obtaining a quick prime in a drafting operation requires the following procedures to be followed in the correct order. The pump will prime much more quickly if drafting is attempted before the tank runs dry.
- Connect the drafting hose to the Cam Lock intake and drop the strainer about 18 inches below the surface of the water. (A utility line can be used to help position the strainer and keep it out of mud or debris.)
- Open the intake valve next to the Cam Lock connection.
- Start the pump and run it at a fast idle.
- Open a discharge such as the dump valve.
- Slowly close the tank suction valve located under the trailer deck near the left side. The idea here is to provide some water from the tank to help expel the air being picked up from the drafting hose, then close it completely once the pump is fully primed at draft. (Unfortunately the tank suction valve had to be located under the trailer deck so that the plumbing could be efficiently drained for winter.)
- If the purpose of the draft is to fill the tank, close the dump valve as soon as prime is obtained and open the tank filler valve located on the trailer deck just behind the water tank.
- Open the inspection cover on the top of the tank to prevent the pump from overpressurizing the tank.
- If the unit is being operated in stationary drafting mode, bypass some water using a garden hose if the pump will be running for long periods without water flowing.
- When the operation is complete, close the intake valve next to the Cam Lock connection, close the tank filler valve (if opened) and reopen the tank suction valve.
- Secure the inspection cover if opened.
- Drain the drafting hose and store it on the trailer.
Example of drafting operation.
Defensive fire streams.
It is not the intent of this unit to be used for offensive fire control. However there could be instances when the water supply may be needed for defensive fire purposes. The following guidelines would then apply.
- Don't attempt to fight fire if you are not properly trained and do not have proper protective equipment unless you are in a "save your own life" situation. Otherwise park the unit in the safest possible location and leave the area.
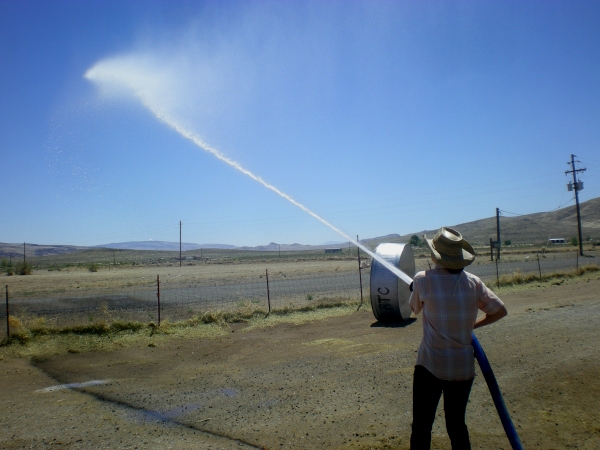
- The best stream for self defense is the 2-inch preconnected line due to its stream reach and volume. However remember that the nozzle discharges around 65 GPM so the tank will likely run dry within 6 minutes. Don't discharge water needlessly!
Illustrating the reach of the 2-inch line.
Hot spots can be effectively extinguished with the booster line.
Available hand tools include a round point shovel and a Polaski tool. When water is limited it is best to utilize hand tools and "finish up" hot spots with water.
If in doubt, get out! If you aren't experienced in defensive fire fighting don't commit to a foolish effort.
Shutting down the pump.
- Return the pump to a slow idle.
- Turn off the ignition.
- Turn off the fuel supply.
- Check gasoline and oil levels. Replenish if necessary.
- Check to make sure all equipment is properly stored, outlet caps are replaced, and equipment boxes properly locked.
Using the dewatering pump.
When relocating large portable tanks, the most efficient initial approach is to draft as much water out of the portable tank as is practical. However the tank may still contain enough water as to be injurious to people trying to tip it over and drain it. A portable hand operated dewatering pump is available to remove residual water from tanks and from other situations where water removal is desired.
Dewatering pump stored next to the drafting hose behind the right fender.
Using the manifold and jetting wands
The use of this equipment is covered in a separate Operations Guide.
The training information presented in these information sheets and guides is offered for illustrative and volunteer refresher purposes only. It is not a substitute for actual hands-on training.
|
Press Back to return to the page which brought you here
Return to LRTC Wild Horse Mentors
Return to KBR Training Page
Go To  KBR Horse Net KBR Horse Net
|